- Published on
Using Opencage Gecoder API with REACT
- Authors

- Name
- Arnaud Ferrand

Photo by Kelsey Knight on Unsplash
This post was previously published on Medium on the 7th November 2018.
Overview
In this tutorial, we will discuss about the integration of Opencage API into a React application.
The prerequisites are, of course, a OpenCage API key, (if you don’t have one, simply use this free registration link), a node platform with yarn or npm; and finally your favourite IDE or Text Editor.
I assume you are familiar with JavaScript. In this tutorial, we’re going to use some ES6 features like arrow functions, classes, let, and const statements.
This tutorial is not about setting up a build environment for React, so for the easy use, we will use create-react-app.
Before we start, here is the source code. And a live version can be found here.
Setup the environment
As current node version, when writing this guide, is 10.12; I assume you can use npx as it is available since version 5.2.
npx create-react-app opencage-react-app
it outputs :
Creating a new React app in \[...\]/opencage-react-app.Installing packages. This might take a couple of minutes.
Installing react, react-dom, and react-scripts...yarn add v1.10.1
\[1/4\] 🔍  Resolving packages...
\[2/4\] 🚚  Fetching packages...
\[3/4\] 🔗  Linking dependencies...
\[4/4\] 📃  Building fresh packages...
success Saved lockfile.
success Saved 11 new dependencies.
info Direct dependencies
├─ react-dom@16.5.2
├─ react-scripts@2.0.5
└─ react@16.5.2
info All dependencies
├─ babel-plugin-dynamic-import-node@2.2.0
├─ babel-preset-react-app@5.0.4
├─ confusing-browser-globals@1.0.4
├─ eslint-config-react-app@3.0.4
├─ eslint-plugin-jsx-a11y@6.1.2
├─ object.assign@4.1.0
├─ react-dev-utils@6.0.5
├─ react-dom@16.5.2
├─ react-error-overlay@5.0.5
├─ react-scripts@2.0.5
└─ react@16.5.2
✨  Done in 79.89s.Initialized a git repository.Success! Created opencage-react-app at \[...\]/opencage-react-app
Inside that directory, you can run several commands: yarn start
    Starts the development server. yarn build
    Bundles the app into static files for production. yarn test
    Starts the test runner. yarn eject
    Removes this tool and copies build dependencies, configuration files
    and scripts into the app directory. If you do this, you can’t go back!We suggest that you begin by typing: cd opencage-react-app
  yarn startHappy hacking!
Start hacking
First part
Let’s do the suggested commands
cd opencage-react-app
yarn start
The project is built in development mode and it opens your favourite browser on http://localhost:3000.
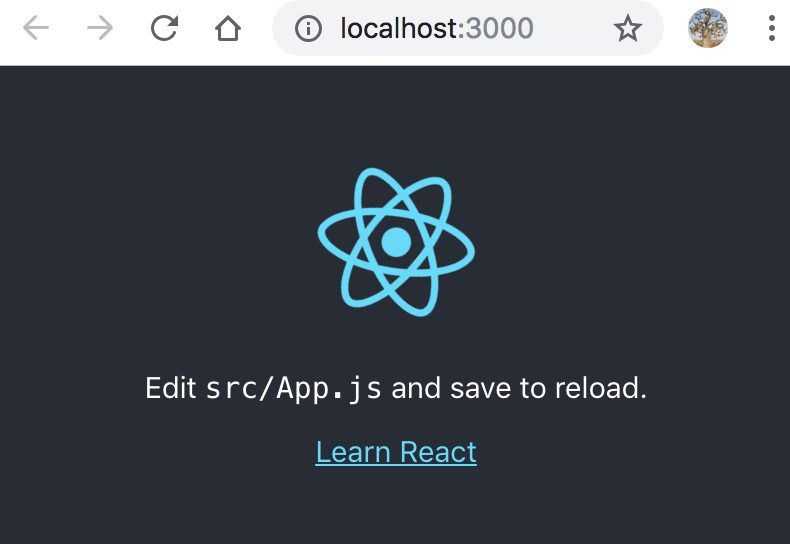
The page will automatically reload if you make changes to the code. So let’s do it.
First of all download opencage svg logo and copy it to the src/ folder
Open your IDE or Text Editor with the folder opencage-react-app
Edit the file ./src/App.js
replace
import logo from './logo.svg'
with
import logo from './opencage-white.svg'
The app is rebuilt and instead of the atomic react logo, you should now have a Open Cage logo.
use CTRL + C to stop the development server.
We will now add dependencies to the project.
First the style, you can pick up your favourite CSS framework (flexbox, bootstrap or material UI), for this tutorial I picked up Bulma as it is javascript free, then no react wrapper is needed to keep this tutorial simple and focused only on opencage geocode API integration.
yarn add bulma
it outputs
yarn add v1.10.1
\[1/4\] 🔍  Resolving packages...
\[2/4\] 🚚  Fetching packages...
\[3/4\] 🔗  Linking dependencies...
\[4/4\] 📃  Building fresh packages...success Saved lockfile.
success Saved 3 new dependencies.
info Direct dependencies
├─ bulma@0.7.2
├─ react-dom@16.5.2
└─ react@16.5.2
info All dependencies
├─ bulma@0.7.2
├─ react-dom@16.5.2
└─ react@16.5.2
✨  Done in 8.61s.
let’s create an Header component:
Rename App.css into Header.css. Then edit Header.css, we will avoid being see sick with the infinite loop animation and place the center text in the header only. The header will be a header not whole view port page.
/* ./src/Header.css */
.App {
}
.App-logo {
  animation: App-logo-spin 10s linear;
  height: 40vmin;
}
.App-header {
  text-align: center;
  background-color: #20b282;
  min-height: 20vh;
  display: flex;
  flex-direction: column;
  align-items: center;
  justify-content: center;
  font-size: calc(10px + 2vmin);
  color: white;
}
.App-link {
  color: #61dafb;
}
@keyframes App-logo-spin {
  from {
    transform: rotate(0deg);
  }
  to {
    transform: rotate(360deg);
  }
}
Create ./src/Header.js file:
// ./src/Header.js
import React, { Component } from 'react'
import logo from './opencage-white.svg'
import './Header.css'
class Header extends Component {
  render() {
    return (
      <header className="App-header">
        <img src={logo} className="App-logo" alt="logo" />
        <p>
          OpenCage <b>Geocoder</b> API.
        </p>
      </header>
    )
  }
}
export default Header
Edit ./src/index.js, adding
import 'bulma/css/bulma.css'
after
import './index.css'
now edit App.js, we first use the Header Component and then we prepare 2 columns.
import React, { Component } from 'react'
import Header from './Header'
class App extends Component {
  render() {
    return (
      <div>
        <Header />
        <div className="columns">
          <div className="column">1</div>
          <div className="column">2</div>
        </div>
      </div>
    )
  }
}
export default App
Now add packages dependencies like the opencage API client, LeafletJS, and classnames:
yarn add opencage-api-client leaflet classnames
- opencage-api-client is the client library for Opencage Geocoder API
- LeafletJS is the well-known web mapping API
- classnames is a javascript utility lib to help build className attributes
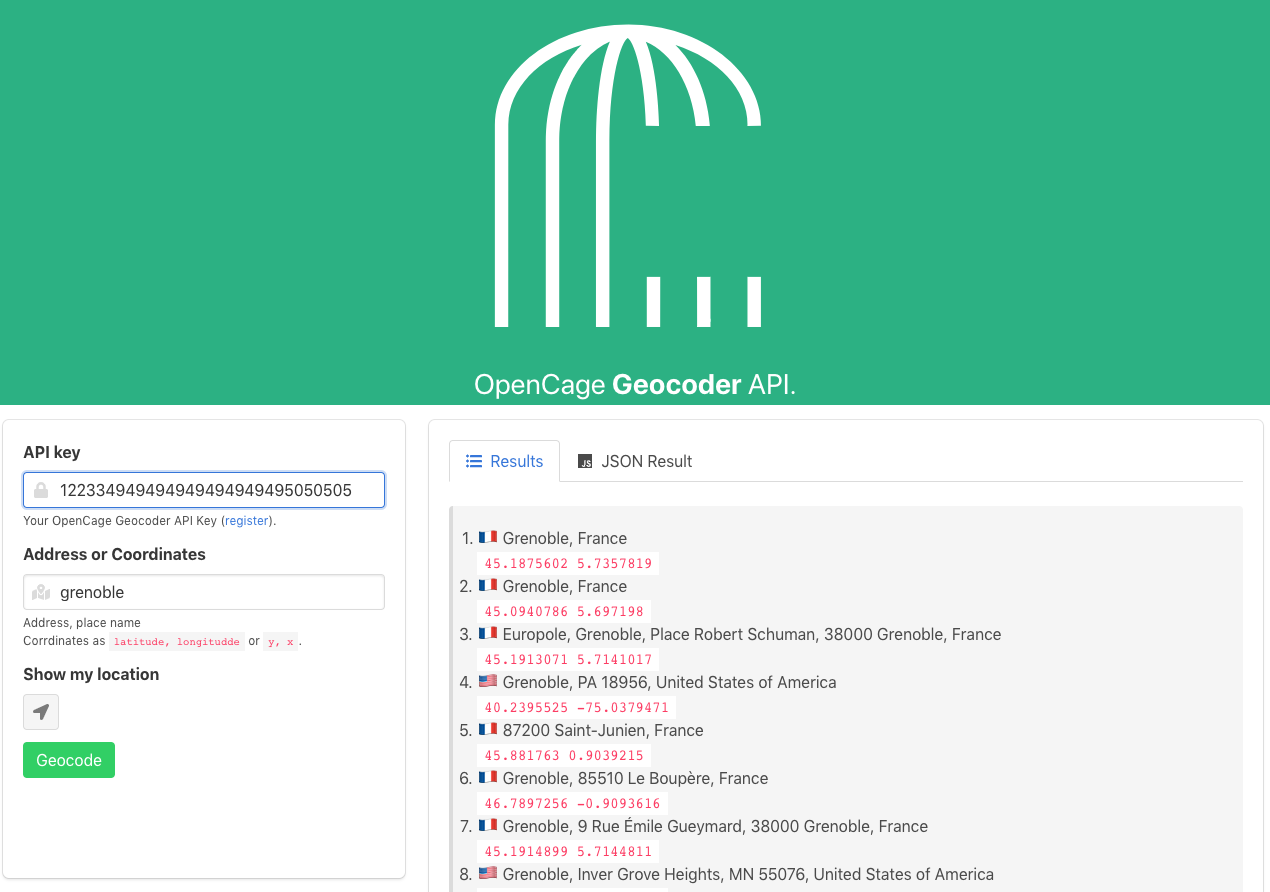
We can start the dev server with $ yarn start
For now the app looks like this

In the first column we will set up the form with the search input parameters. In the second column, we will have the results as multiple tabs, starting with the readable results (formatted address and coordinates), and a second tab with the raw JSON result from the API. As you can see in the following design, we will create two main components and GeocodingFormand GeocodingResults

Create a file ./src/GeocodingForm.js
import React, { Component } from 'react'
class GeocodingForm extends Component {
  constructor(props) {
    super(props)
    this.state = {
      isLocating: false,
    }
    this.handleGeoLocation = this.handleGeoLocation.bind(this)
    this.handleInputChange = this.handleInputChange.bind(this)
    this.handleSubmit = props.onSubmit
  }
  handleGeoLocation() {
    const geolocation = navigator.geolocation
    const p = new Promise((resolve, reject) => {
      if (!geolocation) {
        reject(new Error('Not Supported'))
      }
      this.setState({
        isLocating: true,
      })
      geolocation.getCurrentPosition(
        (position) => {
          console.log('Location found')
          resolve(position)
        },
        () => {
          console.log('Location : Permission denied')
          reject(new Error('Permission denied'))
        }
      )
    })
    p.then((location) => {
      this.setState({
        isLocating: false,
      })
      this.props.onChange('query', location.coords.latitude + ', ' + location.coords.longitude)
    })
  }
  handleInputChange(event) {
    const { target } = event
    const { name } = target
    const value = target.type === 'checkbox' ? target.checked : target.value
    // console.log(name, value);
    // this.setState({
    //   [name]: value,
    // });
    this.props.onChange(name, value)
  }
  handleSubmit(event) {
    console.log('Form was submitted with state: ', this.state)
    event.preventDefault()
  }
  render() {
    const { apikey, isSubmitting, query } = this.props
    const { isLocating } = this.state
    return (
      <div className="box form">
        <form
          onSubmit={(e) => {
            e.preventDefault()
          }}
        >
          {/* <!-- API KEY --> */}
          <div className="field">
            <label className="label">API key</label>
            <div className="control has-icons-left">
              <span className="icon is-small is-left">
                <i className="fas fa-lock" />
              </span>
              <input
                name="apikey"
                className="input"
                type="text"
                placeholder="YOUR-API-KEY"
                value={apikey}
                onChange={this.handleInputChange}
              />
            </div>
            <div className="help">
              Your OpenCage Geocoder API Key (
              <a href="https://opencagedata.com/users/sign_up">register</a>
              ).
            </div>
          </div>
          {/* <!-- ./API KEY --> */}
          {/* <!-- Query --> */}
          <div className="field">
            <label className="label">Address or Coordinates</label>
            <div className="control has-icons-left">
              <span className="icon is-small is-left">
                <i className="fas fa-map-marked-alt" />
              </span>
              <input
                name="query"
                className="input"
                type="text"
                placeholder="location"
                value={query}
                onChange={this.handleInputChange}
              />
              <div className="help">
                Address, place name
                <br />
                Coordinates as <code>latitude, longitude</code> or <code>y, x</code>.
              </div>
            </div>
          </div>
          {/* <!-- ./Query --> */}
          <div className="field">
            <label className="label">Show my location</label>
            <div className="control" onClick={this.handleGeoLocation}>
              {!isLocating && (
                <button className="button is-static">
                  <span className="icon is-small">
                    <i className="fas fa-location-arrow" />
                  </span>
                </button>
              )}
              {isLocating && (
                <button className="button is-static">
                  <span className="icon is-small">
                    <i className="fas fa-spinner fa-pulse" />
                  </span>
                </button>
              )}
            </div>
          </div>
          {/* <!-- Button Geocode --> */}
          <button
            className="button is-success"
            onClick={this.handleSubmit}
            disabled={isLocating || isSubmitting}
          >
            Geocode
          </button>
          {/* <!-- ./Button Geocode --> */}
        </form>
      </div>
    )
  }
}
export default GeocodingForm
Then create a file ./src/GeocodingResults.js
import React, { Component } from 'react'
import classnames from 'classnames'
import ResultList from './ResultList'
import ResultJSON from './ResultJSON'
const RESULT_TAB = 'RESULT_TAB'
const JSON_TAB = 'JSON_TAB'
class GeocodingResults extends Component {
  constructor(props) {
    super(props)
    this.state = {
      activeTab: RESULT_TAB,
    }
  }
  renderTab(title, tab, icon, activeTab) {
    return (
      <li className={classnames({ 'is-active': activeTab === tab })}>
        <a
          href="/"
          onClick={(e) => {
            e.preventDefault()
            this.setState({
              activeTab: tab,
            })
          }}
        >
          <span className="icon is-small">
            <i className={icon} aria-hidden="true" />
          </span>
          <span>{title}</span>
        </a>
      </li>
    )
  }
  render() {
    const { activeTab } = this.state
    const results = this.props.response.results || []
    return (
      <div className="box results">
        <div className="tabs is-boxed vh">
          <ul>
            {this.renderTab('Results', RESULT_TAB, 'fas fa-list-ul', activeTab)}
            {results.length > 0 && this.renderTab('JSON Result', JSON_TAB, 'fab fa-js', activeTab)}
          </ul>
        </div>
        {/* List of results */}
        {activeTab === RESULT_TAB && results.length > 0 && (
          <ResultList response={this.props.response} />
        )}
        {/* JSON result */}
        {activeTab === JSON_TAB && results.length > 0 && (
          <ResultJSON response={this.props.response} />
        )}
      </div>
    )
  }
}
export default GeocodingResults
We need to create files ./src/ResultList.js and ./src/ResultJSON.js
// ./src/ResultList.js
import React, { Component } from 'react'
class ResultList extends Component {
  render() {
    const rate = this.props.response.rate || {}
    const results = this.props.response.results || []
    return (
      <article className="message">
        <div className="message-body">
          <ol>
            {results.map((result, index) => {
              return (
                <li key={index}>
                  {result.annotations.flag} {result.formatted}
                  <br />
                  <code>
                    {result.geometry.lat} {result.geometry.lng}
                  </code>
                </li>
              )
            })}
          </ol>
        </div>
      </article>
    )
  }
}
export default ResultList
// ./src/ResultJSON.js
import React, { Component } from 'react'
import './ResultJSON.css'
class ResultJSON extends Component {
  render() {
    return (
      <article className="message">
        <div className="message-body">
          <pre>{JSON.stringify(this.props.response, null, 2)}</pre>
        </div>
      </article>
    )
  }
}
export default ResultJSON
To finish the first part, wire the application with those two main components (GeocodingForm and GeocodingResults)
Edit the ./src/App.js file, first the imports:
import React, { Component } from 'react'
import Header from './Header'
import GeocodingForm from './GeocodingForm'
import GeocodingResults from './GeocodingResults'
import * as opencage from 'opencage-api-client'
now add a constructor
constructor(props) {
  super(props);
  this.state = {
    query: '',
    apikey: '',
    isSubmitting: false,
    response: {},
  };
  this.handleSubmit = this.handleSubmit.bind(this);
  this.handleChange = this.handleChange.bind(this);
}
the App handles input text changes and the submit.
So first add the handleChange method
handleChange(key, value) {
  this.setState({ [key]: value });
}
Followed by the handleSubmit method
handleSubmit(event) {
  event.preventDefault();
  this.setState({ isSubmitting: true });
  opencage
    .geocode({ key: this.state.apikey, q: this.state.query })
    .then(response => {
      console.log(response);
      this.setState({ response, isSubmitting: false });
    })
    .catch(err => {
      console.error(err);
      this.setState({ response: {}, isSubmitting: false });
    });
}
Last touch for this first part, we add the main components in the render method:
render() {
  return (
    <div>
      <Header />
      <div className="columns">
        <div className="column is-one-third-desktop">
          <GeocodingForm
            apikey={this.state.apikey}
            query={this.state.query}
            isSubmitting={this.state.isSubmitting}
            onSubmit={this.handleSubmit}
            onChange={this.handleChange}
          />
        </div>
        <div className="column">
          <GeocodingResults response={this.state.response} />
        </div>
      </div>
    </div>
  );
}
Here is what the app now looks like
Second part
In this part we will add a map tab in the result section.
First let’s create a ./src/ResultMap.js file :
import React, { Component } from 'react'
import L from 'leaflet'
// import Leaflet's CSS
import 'leaflet/dist/leaflet.css'
import './ResultMap.css'
const redIcon = L.icon({
iconUrl: 'marker-icon-red.png',
iconSize: [25, 41], // size of the icon
iconAnchor: [12, 40], // point of the icon which will correspond to marker's location
})
class ResultMap extends Component {
constructor(props) {
super(props)
this.state = {
map: null,
layer: null,
data: props.response.results,
}
this.mapNode = null
}
componentDidMount() {
// create the Leaflet map object
if (!this.state.map) {
this.initMap()
}
}
componentWillUnmount() {
// destroys the Leaflet map object & related event listeners
this.state.map.remove()
}
initMap() {
if (this.state.map) return
// creates the Leaflet map object
// it is called after the Map component mounts
const map = L.map(this.mapNode, {
center: [45, 2],
zoom: 4,
})
L.tileLayer('https://{s}.tile.openstreetmap.org/{z}/{x}/{y}.png', {
attribution:
'© <a href="https://www.openstreetmap.org/copyright">OpenStreetMap</a> contributors',
}).addTo(map)
const layer = L.featureGroup().addTo(map)
const { results } = this.props.response
for (let i = 0; i < results.length; i++) {
const marker = L.marker(results[i].geometry, { icon: redIcon })
marker.addTo(layer).bindPopup(i + 1 + ' - ' + results[i].formatted)
}
map.fitBounds(layer.getBounds())
// set the state
this.setState({ map, layer })
}
render() {
// const results = this.props.response.results || [];
return <div ref={(node) => (this.mapNode = node)} id="map" data={this.props.data} />
}
}
export default ResultMap
Download the pin icon from marker-icon-red.png and save it to public/ folder.
As the map needs a height, we create a ./src/ResultMap.css file :
#map {
  width: auto;
  min-height: 350px;
  height: 40vmin;
}
Back in ./src/GeocodingResuls.js add the tab in the ul _s_ection
{
  results.length > 0 && this.renderTab('Map', MAP_TAB, 'fas fa-globe-americas', activeTab)
}
and with the other results content add the map:
{
  /* MAP result */
}
{
  activeTab === MAP_TAB && results.length > 0 && <ResultMap response={this.props.response} />
}
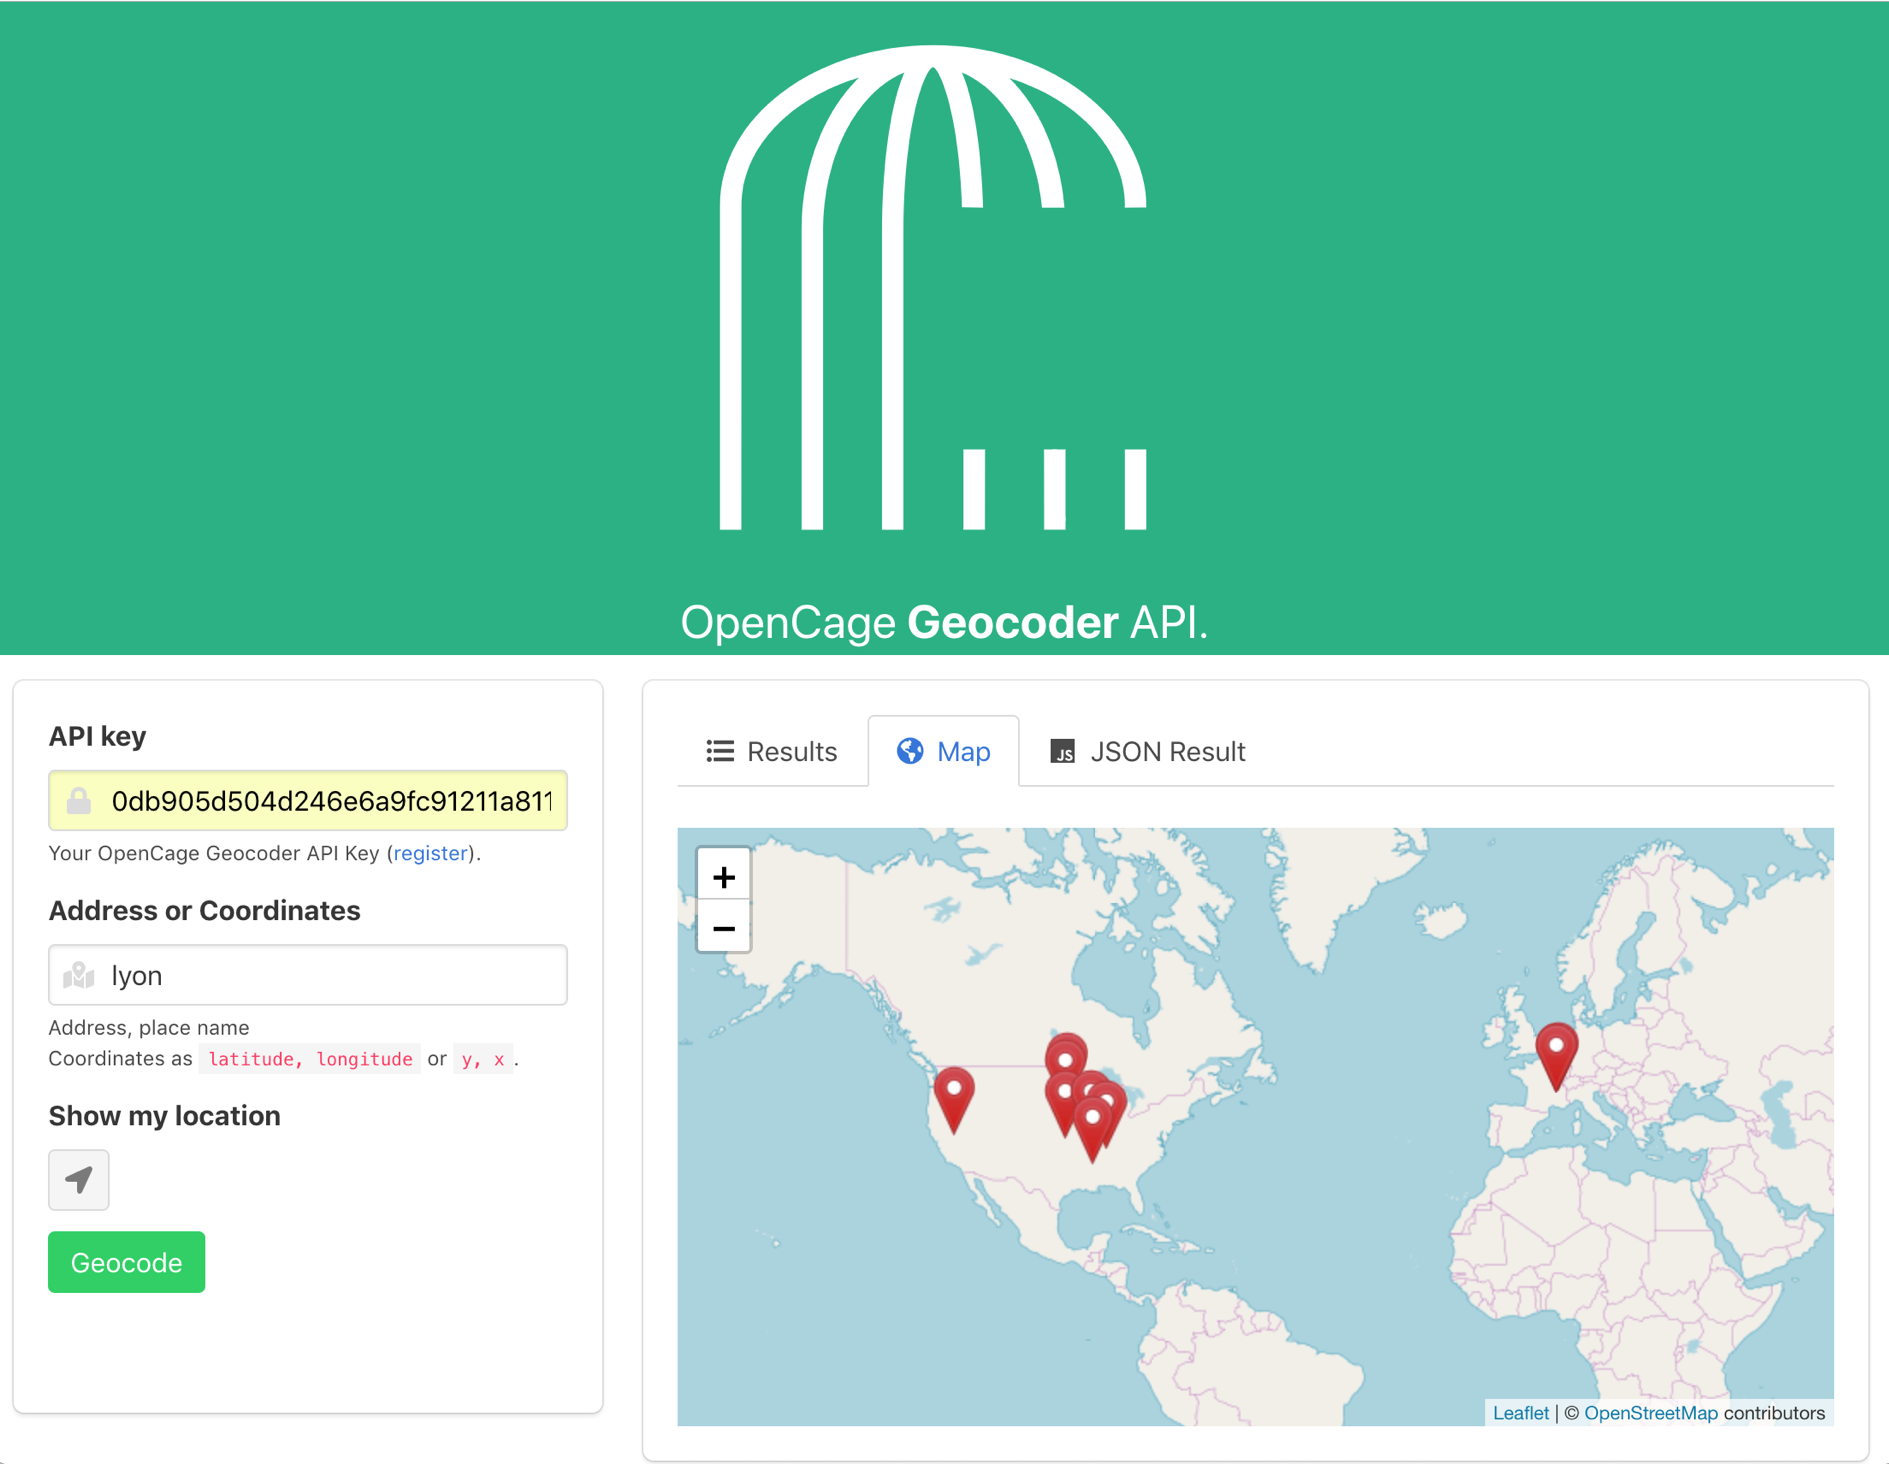
The app now contains a map
I really hope this was helpful for you. If it was, please, do let me know so that I can write more posts like this. You can always reach me out on Twitter and again if you followed this tutorial along till the end, I am really proud of you guys.
Resources
- Opencage Data Geocoder: https://opencagedata.com/
- Source code repository on github : https://github.com/tsamaya/opencage-react-guide
- Demo version on netlify : https://unruffled-kirch-3cd76e.netlify.com/